Pages

Wednesday, December 28, 2011

Oven Roasted Tomatoes


You're not going to find good fresh tomatoes in the Midwest this time of year.  However, you can give those flavorless off-season tomatoes an added kick by roasting them in the oven.  Once you've got them roasted, you can add a blast of tomato-y flavor to anything (they're also delicious for snacking).  I've used them in roasted veggie pasta and lasagna, but they'd also be a great addition to a veggie side dish or tomato sauce.  Oooh!  What about crostini with ricotta, olive oil and roasted tomatoes?!  I might have to make that for my New Years party. (Update: I made it and shared the recipe here.)

Whether we're in the heart of tomato season or the depths of winter, roasted tomatoes will always have great flavor.  They are so easy and can brighten up any dish.

Slow Roasted Tomatoes

Cherry, grape or small Roma tomatoes
Whole gloves of garlic, unpeeled
Olive oil
Herbs such as thyme or rosemary (optional)

Preheat oven to 225. Halve each tomato lengthwise (the Romas I used were a little larger so I quartered them) and arrange on a parchment-lined baking sheet along with the cloves of garlic. Drizzle with olive oil, just enough to make the tomatoes glisten. Sprinkle herbs on, if you are using them, and salt and pepper, though go easily on these because the finished product will be so flavorful you’ll need very little to help it along.

Bake the tomatoes in the oven for about three hours. You want the tomatoes to be shriveled and dry, but with a little juice left inside–this could take more or less time depending on the size of your tomatoes.

Either use them right away or let them cool.  Cover them (and the peeled roasted garlic) with some extra olive oil and keep them in the fridge.

Tuesday, December 20, 2011

Tomato Soup


Grilled cheese and tomato soup is total comfort food for me.  Who doesn't love it?  When I was little I would only eat tomato soup if I was dipping grilled cheese into it.  Luckily I grew out of this, and I'm on a mission to find a homemade tomato soup worthy of becoming a replacement for canned soup.

Grilled cheese and tomato soup is a meal that we eat frequently once the weather cools down.  I keep cheese and a can of tomato soup in the house at all times.  Now that I see how easy tomato soup is, I'll just keep a few cans of tomatoes reserved specifically for soup instead.  However, this particular recipe will not be my go to for tomato soup.  It had a nice flavor, but it wasn't tomato-y enough to be a standard tomato soup.


Tomato Soup
Adapted from Michael Chiarello

1 (14.5 oz) can diced tomatoes
1/4 cup and 1/3 cup extra virgin olive oil
Salt and freshly ground black pepper
1 stalk celery, diced
1 small carrot, diced
1 yellow onion, diced
2 cloves garlic, minced
1 cup chicken broth
1 bay leaf
2 tablespoons butter
1/4 cup chopped fresh basil leaves
1/2 cup heavy cream, optional

Preheat oven to 450.

Strain the chopped canned tomatoes, reserving the juices, and spread onto a baking sheet, season with salt and pepper, to taste, drizzle with 1/4 cup of the olive oil and roast until caramelized, about 15 minutes.

Meanwhile, in a saucepan, heat 1/3 cup olive oil over medium-low heat. Add the celery, carrot, onion and garlic, cook until softened, about 10 minutes. Add the roasted chopped canned tomatoes, reserved tomato juices, chicken broth, bay leaf and butter. Simmer until vegetables are very tender, about 15 to 20 minutes.  Remove the bay leaf, and add basil and cream, if using. Puree with a hand held immersion blender until smooth.  Alternatively, you can puree in a regular blender.  Be careful though, you don't want hot soup flying all over your kitchen (especially not tomato soup).


Tips for Blending Hot Soup:
Don't fill the blender more than 1/3 to 1/2 full.
Remove the cap from the hole in the blender lid.
Put the blender lid on tight and cover the hole with a towel.


Full disclosure:  Red Gold sent me a variety pack of canned tomatoes to try.

Saturday, December 17, 2011

Cranberry Vinaigrette and Harvest Salad


I had some cranberries that needed to be used and decided to make a fun salad dressing.  I am really happy with how this cranberry vinaigrette turned out, a little tart and full of flavor.  It would be delicious over any type of green salad, but I especially like it over this Harvest Salad.  The salad has a great crunch from the apples and toasted nuts and I love how the bleu cheese starts to mix in with the vinaigrette.  The dried cranberries add a touch of sweetness to the mix.  The salad and vinaigrette make a great lunch if you add chicken or turkey.

Harvest Salad

Salad greens (I used a mix of romaine, spinach and arugula, but use whatever you like)
Apples, chopped
Toasted walnuts or pecans, chopped
Bleu cheese crumbles (I used gorgonzola)
Dried cranberries (optional)


Cranberry Vinaigrette
Original Recipe
Yield: 1 1/2 cups

1/3 cup red wine vinegar
1/2 olive oil
1 Tbsp balsamic vinegar
1 cup fresh cranberries
2 Tbsp red onion, minced
Zest from 1 orange
Juice from 1 orange
2-3 Tbsp sugar
Salt and Pepper to taste

In a blender or food processor, combine all of the ingredients.  Continue to process until the cranberries are chopped up and everything is blended.  Taste to see if it needs anymore sugar, salt or pepper, and adjust if needed.

Make a couple hours ahead so the flavors have a chance to meld.

Store the vinaigrette in a mason jar in the fridge.  About 15 minutes before using, take it out of the fridge and remove the lid to let the oil soften.  Right before serving, replace the lid, shake the jar and dress the salad or pour it into a container so everyone can serve themselves.

The cranberry vinaigrette seems to do okay sitting in the fridge for a couple weeks so don't be afraid by the quantity this recipe makes.

Monday, December 12, 2011

Chewy Ginger Cookies


When it comes to cookies, I prefer soft and chewy over crunchy. So when I saw ginger cookies (not crunchy ginger snaps) at a bake sale, I had to try them. It was love at first bite: gingery, spicy, chewy, moist, and I love the pieces of candied ginger in them.  I asked around to see who brought them so I could get the recipe, and luckily they sent it to me. I've been making these cookies every Christmas season since I first tasted them.


I recently baked the Chewy Ginger cookies for the 1st Annual Great Food Blogger Cookie Swap (set up by Julie of The Little Kitchen and Lindsay of Love and Olive Oil).  Everyone was assigned three food bloggers to send one dozen cookies, and they would receive cookies from three different bloggers.  With over 22,000 cookies sent around the world, this is quite possibly the largest cookie swap ever!


I received Mostaccioli (Italian Chocolate Spice Cookies) from Justine at A Half Baked Life, Lavender Shortbread Cookies from Ellie at White and Dorky Chef and Cardamom and Sesame Cookies from Joanna at Meatless Most Days.   I loved that all of these cookies were different than anything I've tried before.  Ellie suggested pairing the Lavender Shortbread with tea and it was a great combo.  It was a fun coincidence that Justine sent me a traditional Italian cookie without knowing that I had just been to Italy.  The Cardamom Sesame Cookies tasted like they could be Chinese.  All of the cookies were delicious, and I definitely see myself making them at some point.


Over 620 bloggers participated so it took two roundup posts to showcase them all:  Part 1 and Part 2.  There is also a Facebook page devoted to the cookie swap.


If you're a food blogger (or will be by next fall) and want to participate in the 2nd annual cookie swap, you can sign up here for notifications about next year's swap.


Chewy Ginger Cookies
Adapted from The Ginger People via a coworker
Yield: 4 dozen cookies

3/4 cup (1.5 sticks) butter, softened
1 cup sugar
1/4 cup molasses
1 egg
2 cups (+ 1/4 cup flour to stir into the chopped crystallized ginger)
1/2 tsp ground cloves
1/2 tsp ground ginger
1 tsp cinnamon
2 tsp baking soda
1/2 tsp salt
4 oz crystallized (or candied) ginger, chopped
Turbinado Sugar, for rolling (~ 1 cup)

Preheat the oven to 375F. In a mixing bowl, combine the butter, sugar, molasses and egg. Beat well.  In a separate bowl, whisk the dry ingredients together. Then gradually add the dry ingredients to the wet mixture and mix until combined. Stir in the floured crystallized ginger. Cover the mixing bowl tightly with foil or plastic wrap, and chill the dough for at least 1 hour. Form the dough into 1-inch balls and roll in sugar. Place on a greased cookie sheet, 2 inches apart. Bake for 8-10 minutes. If you prefer crunchier cookies, just bake them a little longer.


Recipe Notes:
- Crystallized/candied ginger can usually be found in the bulk section or wherever the dried fruit and nuts are in your grocery store.
- Turbinado sugar is similar to sugar in the raw
- Regular sugar can be substituted for the turbinado sugar
- The ginger can be difficult to chop if your knife isn't sharp.  Pull out that sharpening steel that came with your knife block.  If you're not sure how to use it, check this out.
- Sometimes the candied ginger will stick to the knife. If this happens, just clean off the knife, and grease it with a little butter.
- Try to keep the dough as cool as possible.  I usually stick the filled cookie sheets in the fridge until that batch is ready to go into the oven.

Friday, December 9, 2011

Baked Spinach


I made this baked spinach recipe for a dinner party and it got rave reviews.  In fact, everyone thought it tasted so good that you could serve it as an appetizer and scoop it up with tortilla or pita chips.  It really is that good!  I had to share it with more people so I brought it to Thanksgiving.

Prepping and cooking the spinach was really quick because I didn't have to stem the leaves.  The stems on baby spinach are soft when they're cooked.  If you use regular spinach, the stems won't softened as much, so you should remove them.  Since spinach is the main flavor, I recommend using fresh leaves, but in a pinch, you could probably use frozen spinach that's been thawed and squeezed of excess water.

You can definitely make this ahead too.  You can stop after the spinach is cooked and finish the rest closer to dinner.  You could also prep everything up to adding the cheese and seasoning the spinach.  Then just before you're ready to put it in the hot oven, add the remaining cheese and breadcrumbs.


Baked Spinach
Adapted from Annie's Eats
Yield: 6 servings

3 lb fresh spinach I used baby spinach.
3½ Tbsp unsalted butter, divided
Salt and pepper
1½ Tbsp flour
1 cup stock (milk, broth, or cream)  I used cream both times.
3/4 cup grated cheese, divided (Parmesan, Romano, Asiago, Gruyere, etc.) I used parmesan and romano.
2 Tbsp dry breadcrumbs

Stem and wash the spinach, draining it but letting drops of water still cling to the leaves. Place the spinach in a large pot covered with a lid over high heat. (Since spinach takes up some much space, I had to cook it in my largest stockpot in 2 batches.)  Cook, stirring occasionally, until wilted (2-4 minutes for baby spinach, 4-6 for regular spinach). Transfer the spinach to a colander, fill the pot with cold water, and immediately return the spinach to the pot with the cold water to stop the cooking. Drain again. Working with a handful at a time, squeeze the spinach to extract as much excess water as possible. Coarsely chop the spinach. (You should have about 3 cups of chopped spinach.)

Wipe out the pot and then melt 2 tablespoons of the butter over medium-high heat. Stir in the chopped spinach. Cook, stirring frequently, until all of the moisture has been boiled off (when the spinach starts to stick to the pan).

Reduce the heat to medium and sprinkle the flour over the spinach. Cook, stirring frequently, for about 2 minutes. Stir in about 2/3 of the cooking liquid a small amount at a time, scraping the bottom of the pan as you go. When the liquid has been added, stir for another minute or two. If needed, add in the remaining liquid. Season with salt and pepper to taste.

Preheat the oven to 375. Mix ½ cup of the shredded cheese into the spinach mixture and then spread the mixture into a lightly greased baking dish. Toss the remaining ¼ cup of cheese with the bread crumbs and sprinkle the mixture evenly over the top. Melt the remaining 1½ tablespoons of butter and drizzle over the top. Bake until lightly browned and heated through, about 30 minutes.

Tuesday, November 29, 2011

Chocolate Peanut Butter Cake


For my birthday I got to have a whole extra hour thanks to Daylight Savings Time!  This was my last birthday before I turn 30, so I better make this year count.  I've got my 30 Before 30 to try to complete, and hopefully I'll cross off a few more things from my Culinary To Make List.  But I'll tell you what, making the trek over to Europe was a nice addition to my late 20s.  Kevin and I recently spent three weeks in France and Italy and had an absolute blast!  We were definitely not ready to come home yet.

Positano, Italy

Since my birthday is the week after Halloween, sometimes I like to incorporate leftover candy into my cake.  A few years ago I made mini ice cream "cakes" with peanut butter cups as the base.  Line muffin tins with foil cupcake liners, then put in a peanut butter cup.  In a separate bowl, mix some ice cream with peanut butter, then spoon it over the peanut butter cup filling the muffin cup.  Top with salted peanuts and press down.  Cover with foil and freeze until ready to eat.  Remove foil wrapper before plating, then drizzle with chocolate syrup and serve.


This year I hoarded all the leftover peanut butter cups again so I could make a cake with the chocolate and peanut butter combination.  I ended up doing a chocolate cake with peanut butter frosting topped with chopped peanut butter cups.  It was delicious, but very rich, best sampled in smaller pieces.


Reese’s Cup Chocolate Peanut Butter Cake
Adapted from Annie's Eats (cake originally from Dorie Greenspan, frosting from Ina Garten)


Chocolate Cake:
2 cups flour
1/2 cup cocoa powder
1/2 tsp baking powder
1/2 tsp baking soda
1/2 tsp salt
1 cup (2 sticks) unsalted butter, room temperature
1 1/2 cups sugar
2 large eggs
2 large egg yolks
1 tsp vanilla extract
1 cup buttermilk
4 oz bittersweet chocolate, melted and cooled

Peanut Butter Frosting:
2 cups confectioners sugar
2 cups creamy peanut butter
10 Tbsp (1 stick plus 2 Tbsp) unsalted butter, at room temperature
1 1/2 tsp pure vanilla extract
1/2 tsp salt
2/3 cup heavy cream
miniature Reese’s cups, halved and/or chopped

For the cake, center a rack in the oven and preheat the oven to 350.  Butter two 9×2” round cake pans, dust the insides with flour, tap out the excess and line the bottoms with rounds of parchment paper.  Place the pans on a baking sheet.

In a medium bowl, whisk together the flour, cocoa powder, baking powder, baking soda and salt.  Set aside.

In a stand mixer fitted with the paddle attachment, beat the butter on medium speed until soft and creamy.  Add the sugar and beat for about 2 minutes, until thoroughly blended into the butter.  Add the eggs and yolks one at a time, beating for one minute after each addition and scraping down the sides of the bowl as needed.  Beat in the vanilla.  Reduce the mixer speed to low and add the dry ingredients alternately with the buttermilk; add the dry ingredients in 3 additions and the buttermilk in 2 (beginning and ending with the dry ingredients).  Mix each addition only until it is blended into the batter.  Scrape down the bowl and add the melted chocolate, folding it in with a spatula.  Divide the batter between the prepared cake pans.

Bake for 26-30 minutes or until the cakes feel springy to the touch and start to pull away from the sides of the pans.  Transfer to wire racks to cool for about 5 minutes, then run a knife around the sides of the cakes, unmold them and peel off the paper liners.  Invert and cool to room temperature right side up.

While the cake is cooling, make the frosting by combining confectioners sugar, peanut butter, butter, vanilla and salt in the bowl of a stand mixer fitted with the paddle attachment.  Beat on medium-low speed until creamy, scraping down sides and bottom of bowl as needed.  Add the cream, and beat on high speed until smooth.

To assemble the cake, place one cake layer on a plate or cardboard circle covered in foil.  Spread peanut butter frosting on top of the cake layer.  (If desired, sprinkle with chopped Reese’s cups.)  Place the second cake layer on top of the frosting.  Frost the top and outside of the cake with remaining peanut butter frosting.  Decorate with halved and chopped Reese’s cups as desired.

Monday, November 21, 2011

Almond, White Chocolate, Cherry Granola Bars from Amie at My Retro Kitchen

The November event for the Cleveland chapter of the Ohio Blogging Association is a blog swap.  Bloggers from all over Northeast Ohio will be trading blogs for the day.  Participating in a blog swap is a great way to discover new blogs and introduce different readers to your own.  For the full list of all OBA blog swappers, please check out Poise in Parma.

I am paired up with Amie from My Retro Kitchen.  I was first introduced to her blog back in April when she featured Alicia (aka Poise in Parma) on her Fridays, Feasting with Friends segment, but I had the pleasure of meeting Amie in person at last month's OBA event.  Amie has some really great recipes so I hope you'll check out her blog.


Hi everyone!  I am so excited to be guest on Cooker Girl today- so fun!  My name is Amie and I write the food blog My Retro Kitchen.  The concept of My Retro Kitchen grew from the idea that a home-cooked meal is something of the past.  It is a retro idea. I think it is one of the best things a person can give their family! A huge part of nurturing my family is by feeding them well.  In my book, full happy bellies = a happy husband and children.  And when you have a happy family, you also have a happy mommy!

Jackson, my 4 year old son is my number one assistant in the kitchen.  He has developed a love for cooking and has a huge appetite for yummy food.  These granola bars are one of our most favorite things to cook (and eat!) together.  They are easy-peasy and so super versatile.  So easy, that it almost makes it silly to ever buy them from a store again.  Plus when you make them at home, you know exactly what is going in them- no weird processed stuff in these babies!!  Almond, White Chocolate Cherry is the most requested flavor, but don’t be afraid to play around with your ingredients; different dried fruits, mixed cereals, nuts and seeds.  The possibilities are endless!  
With the Christmas Season approaching it is time to start thinking about gift giving.  A tin of these homemade treats wrapped with a pretty bow would make a beautiful, heartfelt gift that anyone would love!

Almond, White Chocolate, Cherry Granola Bars
recipe from My Retro Kitchen
Ingredients
2 1/2 cups rolled oats
1 cup almonds
1 cup rice crispies
1 teaspoon sea salt
1 teaspoon cinnamon
1 teaspoon vanilla
1/4 cup honey
1/4 cup brown sugar
3 tablespoons canola oil
1 tablespoon water
1 cup dried cherries
1 cup white chocolate chips, plus more for sprinkling on top
Directions
Preheat the oven to 325. Line a square 8" baking pan with 2 crisscrossed rectangles of parchment paper, leaving a 2-inch overhang at 2 opposite ends. The overhang is what will assist you in lifting the granola out of the pan for cutting.
Combine the oats and almonds and spread them out evenly on a parchment-lined rimmed baking sheet and toast for 15 minutes. When the oat mixture has been toasting for about 10 minutes, combine the honey, brown sugar, salt, cinnamon, vanilla, oil and water in a medium sauce pan over medium-low heat, whisking to dissolve the sugar.
When the oat mixture is done toasting, transfer it to a large bowl and add the honey mixture, rice crispies, white chocolate chips and fruit; stir to incorporate. Spread evenly in bottom of pan, pressing down to create a smooth, even top.
Bake the granola mixture for 30 minutes. Remove the pan from the oven and place on a wire rack to cool. After about a half and hour, press down again super HARD to make sure everything sticks together and you can get nice, firm bars. A measuring cup works well for this. Sprinkle the rest of the white chocolate chips on top and press down lightly.

Let cool completely.  I am serious here.  I know it is insanely tempting, but if you cut them too soon they will crumble everywhere and they won't be granola bars anymore.  Just granola.  Wait at least 2-3 hours before trying to cut them apart.

Once cool, lift out of pan using paper as handles.  Cut into one-inch wide bars with a large, sharp knife. Then, cut them again in half lengthwise. Store in an airtight container.  If you aren't going to eat them all within a week, be sure to refrigerate or freeze them.  There are no preservatives in these, so they won't last forever and a lifetime in your pantry like the store bought kinds.


Friday, November 11, 2011

30 Before 30

I've been noticing a lot of personal lists online lately, and some of you know how much I love lists.  Have you seen my Culinary To Make List?  I have a little less than a year to finish out my twenties, and I thought a 30 before 30 list would be fun.  Some of these items will also help me get out of the house during the long Cleveland winter (we had our first snow last night).

30 Before 30:
(in no particular order)
  1. Attend a concert at Blossom
  2. Keep in touch with people better
  3. Blog more regularly
  4. Participate in a blog swap
  5. Sing karaoke in public
  6. Bake for a good cause
  7. Visit my sister in Atlanta
  8. Visit my brother in New Orleans
  9. Volunteer more
  10. Attend a Tremont Art Walk
  11. Visit one of Cleveland's beaches
  12. Now that the elephants are back in their new habitat, I want to visit the zoo again.
  13. Visit the MetroParks outside of Solon
  14. Host more parties
  15. Learn how to draw
  16. Spend less time on the computer
  17. Visit Stan Hywet Hall
  18. Try to relax
  19. Make our wedding album (our 5 year anniversary is a month before I turn 30)
  20. Visit the west side more often
  21. Attend a Lake Erie Monsters game
  22. Attend a Burning River Roller Girls match
  23. Go skydiving
  24. Learn how to use some of the features on our new camera
  25. Go tobogganing
  26. Be more positive about day to day stuff
  27. Try at least 6 new restaurants
  28. Drink more wine
  29. Visit Cleveland's Asiatown and eat dim sum
  30. Exercise more

Okay, who wants to make a date to start scratching some of these items off?

Tuesday, November 1, 2011

Candy Corn & Peanuts


I know it's a little late now that Halloween is over, but just in case you have some Candy Corn left, here is a simple treat.  All you do is mix together peanuts and candy corn.  If you eat both at the same time, it tastes like a Pay Day candy bar.  I was introduced to this salty sweet combo last fall, and totally forgot about it until now.  Enjoy!

Thursday, June 16, 2011

2 Year Blogiversary

I've been taking some time off from blogging recently, but I didn't want to miss my two year blogiversary.  Since last year, I actually started posting regularly (well, with the exception of the past two months).  I also started meeting some other bloggers in Cleveland when I joined the Ohio Blogging Association last fall.  It's been really great getting to know this amazing group of people.

Going into my third year blogging, I've been thinking about buying a domain name and possibly switching from Blogger to Wordpress, but we'll see.

Here are a few posts from the past year, thanks for reading!

We had a Beer and Chili Party, I provided dessert in the form of Sugar Cookie Bars and Pumpkin Cupcakes:


I made a Lemon Cake with Raspberry Curd for my three year wedding anniversary:


I recreated my Grandpa's Goulash:


I scratched English Toffee off my Culinary To Make List:


I made another family favorite (this time from my Gram) Chocolate Crackles:


I created an appetizer (Goat Cheese, Grape and Candied Walnut Bruschetta) that turned out to be pretty impressive:


I started cooking more fish, Fish Tacos are a favorite:


I shared my Pi Day Pie Party menu:


For the second year in a row, I made treats for Valentine's Day to send out to family and friends.  The cake balls were a hit!


For something a little different, I made Beet Risotto:

Tuesday, April 19, 2011

Peanut Butter Blossom Cupcakes


I had chocolate buttercream leftover from the cake balls so I decided cupcakes were in order.  I love the combination of chocolate and peanut butter so I found a peanut butter cupcake recipe in a cookbook my sister gave me for Christmas.  I love those peanut butter blossom cookies (the ones with the Hershey Kiss on top), so I created something similar with these cupcakes.  I had some mini peanut butter cups in my baking stash so I plunked one into the batter before baking.  The cake was nice and light, but best of all it was peanut buttery.  The peanut butter cup in the middle and the chocolate frosting really pulled it all together for a fantastic combination.  The cupcakes were pretty tasty even without the chocolate frosting on top.

Just so we're clear, I think the title is a little misleading.  These treats look like cupcakes, but they are a little more dense and cookie-like than cupcakes.  They're a deliciously large version of the peanut butter blossom cookies.

Peanut Butter Blossom Cupcakes
Adapted from Cupcakes and Muffins

4 Tbsp (half stick) butter, softened
Heaping 1 cup packed brown sugar
1/2 cup crunchy peanut butter (I used creamy because that's all I had)
2 eggs, lightly beaten
1 tsp vanilla
1 2/3 cups all purpose flour
2 tsp baking powder
Generous 1/3 cup milk

16 mini peanut butter cups, unwrapped
Chocolate Frosting (leftover from Cake Balls)

Preheat oven to 350 F.  Line two 12-hole muffin tins with 16 paper liners.  Place the butter, sugar and peanut butter in a bowl and beat together for 1-2 minutes, or until well mixed.  Gradually beat in the eggs, then add the vanilla.  Sift in the flour and baking powder, then fold them into the mixture, alternating with the milk.  Spoon the batter into the paper liners.  Place a peanut butter cup into each muffin cup and push down until the top of the candy is just below the top of the batter.

Bake in preheated oven for 25 minutes or until well risen and golden brown.  Transfer to a wire rack to cool completely.  Once cooled, frost the cupcakes.


Tuesday, April 12, 2011

Coconut Cake


Whenever we have dinner with my in-laws, I usually get to be in charge of dessert.  Easter was with them last year, and I was just coming off four weeks of the Wilton cake decorating classes.  Since I had made and decorated so many cakes recently, I didn't want to make another one for Easter.  However, I had buttercream leftover from my decorating classes that were springy colors.  I didn't want to waste the frosting so I off I went to bake another cake.

I decided on Baking Illustrated's Coconut Cake.  They recommend using cream of coconut instead of coconut milk because the fat content in coconut milk varies so much between brands.  This was the first time I had set out to look for cream of coconut, and had a heck of time finding it.  So here's a tip for you:  Look in the ethnic food section and the drink mixer section in your grocery store.

Between the cake batter and the frosting, the recipe uses the contents from one can.  UNLESS, you screw up and forget to add the sugar and don't remember until the cake's been in the oven for 15 minutes!  Then you'll end up using a second can to make up for your mistake.  Oops!

This cake was moist and coconutty and I would definitely make it again.  I wasn't a big fan of the coconut frosting on it's own, but when you eat it with the cake it was good.

Coconut Cake

For the cake:
1 egg
5 egg whites
3/4 cup cream of coconut
1/4 cup water
1 tsp vanilla extract
1 tsp coconut extract
2 1/4 cups cake flour, sifted
1 cup sugar
1 Tbsp baking powder
3/4 tsp salt
12 Tbsp (1.5 sticks) unsalted butter, cut into 12 pieces, softened, but still cool
2 cups packed sweetened shredded coconut
Green food coloring, optional

For the frosting:
4 large egg whites
1 cup granulated sugar
pinch of salt
1 pound unsalted butter (4 sticks) cut into 6 pieces, softened, but still cool
1/4 cup cream of coconut
1 tsp coconut extract
1 tsp vanilla extract

For the cake: adjust oven rack to lower-middle position and heat oven to 325. Grease two 9-inch round cake pans with butter and dust with flour, tapping out the excess. 

Beat egg whites and whole egg in large measuring cup with a fork to combine. Add cream of coconut, water, vanilla, and coconut extract and beat with fork until thoroughly combined.

Combine flour, sugar, baking powder, and salt in the bowl of a stand mixer fitted with the paddle attachment. Mix on lowest speed to combine, about 30 seconds. With mixer still running on lowest speed, add butter 1 piece at a time, then beat until mixture resembles coarse meal, with butter bits no larger than small peas, 2 to 2 1/2 minutes.

With the mixer still running, add 1 cup of egg mixture. Increase speed to medium-high and beat until light and fluffy, about 45 seconds. With mixer still running, add remaining 1 cup egg mixture in steady stream (this should take about 15 seconds). Stop mixer and scrape down bowl with rubber spatula, then beat at medium-high speed to combine, about 15 seconds. (Batter will be thick.)

Divide batter between cake pans and level with offset or rubber spatula. Bake until deep golden brown. Cakes pull away from sides of pans, and toothpick inserted into center of cakes comes out clean, about 30 minutes (rotate cakes after 20 minutes). Do not turn off the oven if you are going to toast your coconut.

Cool the cakes on wire racks for about 10 minutes then loosen the cakes from the sides of the pan with a paring knife, invert the cakes onto racks, then reinvert them so the top sides face up; cool to room temperature.

Coloring the Coconut (optional):  If you want to make the coconut look like grass, you can put the shredded coconut into a large bowl with a few drops of green food coloring.  Mix until all the coconut is even and the desired color, add more food coloring if needed.  If you go with this option, do not toast coconut.

Toasting the Coconut (optional): While cakes are cooling, spread shredded coconut on rimmed baking sheet.  Toast in oven until coconut is a mix of golden brown and white, about 15-20 minutes, stirring 2 or 3 times. Cool to room temperature.

For the Buttercream: Combine the egg whites, sugar, and salt in a mixing bowl. Set the bowl over a saucepan containing 1 1/2 inches of barely simmering water. Whisk constantly until mixture is opaque and warm to the touch and registers 120 degrees on an instant-read thermometer, about 2 minutes.  (Note that this temperature is not hot enough to eliminate the unlikely presence of salmonella bacteria in the eggs.)  Remove from the heat.

Transfer bowl to the mixer and beat whites on high speed with whisk attachment until barely warm (about 80 degrees) and whites are glossy and sticking, about 7 minutes. Reduce speed to medium-high and beat in butter 1 piece at a time. Beat in cream of coconut and coconut and vanilla extracts. Stop mixer and scrape bottom and sides of bowl. Continue beating at medium-high speed until well combined, about 1 minute.

To Assemble the Cake: Cut the cakes in half horizontally using a long serrated knife so each cake forms 2 layers. Put a dab of icing on a cardboard round cut just larger than the cake. Center one cake layer on the round. Place a large blob of icing in the center of the layer and spread it in to the edges with an icing spatula. Hold the spatula at a a 45 degree angle to the cake and drag it across the surface to level the icing. Repeat with remaining cake layers. To ice the sides of the cake, scoop up a large dab of icing with the tip of the spatula and spread it on the sides with short side-to-side strokes. Sprinkle the top of the cake with coconut. Then press the coconut into the sides, letting the excess fall back onto a baking sheet.

Tuesday, April 5, 2011

Bolognese Sauce


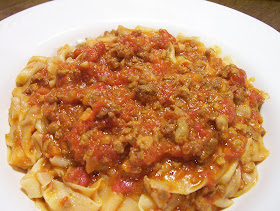
Before making this, I'd never eaten bolognese sauce.  I refuse to make spaghetti and tomato sauce because I'm not a fan.  Maybe I've only had blah-zay sauces, but in any case, I refuse to make it.  I'd heard really good things about bolognese sauce in general so I thought I would see what the fuss was all about.  Let me tell you, this sauce was fabulous!  The flavor is so complex that I don't even know how to describe it, but it's really good.

Bolognese sauce does take some time to make, but it's mostly inactive time on your part.  I definitely recommend you spend an afternoon with bolognese on the stove because this was so worth it!  This recipe makes a ton so there is plenty to freeze.  I used some of the leftovers to make Bolognese Lasagna which turned out really well too.  And since the bolognese is already made, it may be one of the quickest lasagna's you'll ever make.

Bolognese Sauce
Adapted from Cook's Illustrated

Don’t drain the pasta of its cooking water too meticulously when using this sauce; a little water left clinging to the noodles will help distribute the very thick sauce evenly into the noodles, as will adding an extra 2 tablespoons of butter along with the sauce. Top each serving with a little grated Parmesan and pass extra grated cheese at the table. 

6 Tbsp unsalted butter (I used 4 Tbsp butter & 2 Tbsp bacon grease)
1/2 small onion, finely minced
1 small/medium carrot, finely minced
1 celery stalk, finely minced
3 Tbsp tomato paste
6 cloves garlic, minced
1 1/2 lb ground beef, or combo of 3/4 lb ground beef and 3/4 lb ground pork 
1 tsp salt  
2 cups whole milk  
2 cups dry white wine (such as sauvignon blanc, an oaked chardonnay is not recommended)
2 cups chicken stock
1 parmesan cheese rind (removed from the wedge, cheese grated for serving)
2-28 oz cans crushed tomatoes or whole tomatoes and crush by hand (avoid the ones packed in puree)
1/4 cup Italian parsley, chopped fine

Heat butter in large, heavy-bottomed Dutch oven over medium heat; add onion, carrot, and celery and saute until softened but not browned, about 10 minutes. Make a bare spot in the pan and add the tomato paste. Let it caramelize for about 2 minutes, then stir together with the vegetables until thickened and red. Add half the garlic and cook until just fragrant, about 1 minute. Add ground meat and 1 teaspoon salt; Stir the meat until the garlic and vegetables are incorporated. Do not brown them. Crumble meat with edge of wooden spoon to break apart into tiny pieces. Cook, continuing to crumble meat, just until it loses its raw color but has not yet browned, about 4-6 minutes. The meat should be very fine without large or medium chunks.

Add milk and bring to simmer; continue to simmer until milk evaporates and only clear fat remains, 30 minutes. Add wine and bring to simmer; continue to simmer until wine evaporates, 30 minutes longer.  Add chicken stock and bring to simmer; continue to simmer until stock evaporates, 30 minutes longer.

Add the rest of the garlic, the crushed tomatoes with juice, and stir well, then bring to simmer; Add the parmesan cheese rind and push it just below the surface (this will add flavor so use salt sparingly to taste until the end.)

Reduce heat to very low so that sauce continues to simmer just barely, with an occasional bubble or two at the surface, until liquid has evaporated, about 4 hours. When the sauce is done, carefully discard the cheese rind. Finish with the parsley. If desired, finish with a splash of olive oil, or butter. Adjust seasonings with extra salt to taste. Drain pasta from water, and return pasta to its own pot. Then add sauce to mix together with the pasta. Reserve some sauce to pass at the table.

Leftovers can be refrigerated in an airtight container for several days or frozen for several months. Warm over low heat before serving.

Tuesday, March 29, 2011

Beet Risotto


I had a collection of root vegetables (beets, parsnips, potatoes and sweet potatoes) laying around so one night I decided to roast them all.  I cut everything up and on one baking sheet mixed the parsnips, potatoes and some sweet potatoes with olive oil, salt and pepper.  On another baking sheet I had the rest of the sweet potatoes on one side and the beets on the other (both mixed with olive oil, salt and pepper).

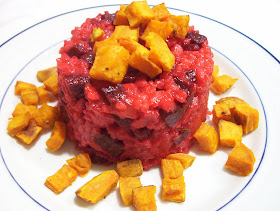
I decided to use the variety tray to make a soup (I pureed the veggies with chicken broth).  The roasted beets made their way into risotto, and the leftover sweet potatoes were used as a side/garnish.  I filled a measuring cup with risotto then turned it upside down on a plate for a fun presentation.

I was really happy with how this turned out!  You get a nice roasted earthy flavor from the beets mixed with the creaminess of the rice and cheese.  Plus it's bright pink, so it'll make any dinner plate more colorful!

Beet Risotto
Original Recipe
Yield: about 3 cups of risotto

4 small beets, scrubbed, peeled and diced
1 Tbsp olive oil
3 1/2 cups chicken stock
1 Tbsp butter
1 medium onion, diced
2 cloves garlic, minced
1 cup Arborio rice
1/3 cup grated parmesan cheese
Salt & Pepper to taste

Preheat the oven to 425.  Line a baking sheet with foil and add the diced beets.  Drizzle olive oil over the beets, sprinkle with kosher salt and pepper, then mix it all around so the beets are evenly coated.  Roast in the oven, stirring occasionally) for about 40 minutes or until the beets are tender.

After the beets have been roasting for about 20 minutes, heat the chicken stock in a small saucepan (not boiling).  In a large saucepan on medium-high heat, saute the onions in butter until soft, 3 minutes.  Add the garlic to the pan for 30 seconds before adding the rice and a pinch of salt and pepper.  Stir constantly for 1-2 minutes without browning the rice.

Pour 3 cups of the hot stock into the rice mixture and stir.  You don't have to stir constantly, but keep an eye on it so the rice doesn't burn.  When almost all the stock has been absorbed by the rice, add the roasted beets and the last 1/2 cup of stock.  Stir until the stock is absorbed.  Remove the risotto from heat and stir in the parmesan cheese.  Add salt and pepper to taste.